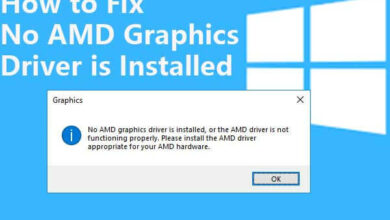
This article will show unknown usb device set address failed. USB gadgets are among the frequently used devices daily from plugging mobile devices for charging using pen drives, you are making use of USB drives. However, there are times when you may come across an error message saying, “Unknown USB Device” as you connect your USB tool on your Windows 10 computer.
So if you encounter this sort of error message adhered to by either of the following descriptions, read on as this message will offer you a couple of ideas you can look into to deal with the concern.
How You Can Set Unknown Usb Device Set Address Failed
In this article, you can know about unknown usb device set address failed here are the details below;
- Device Descriptor Demand Stopped Working
- Port reset fallen short
- The gadget stopped working list
- Set address failed
- Error code 43
You can fix this error utilizing several ways. You can attempt transforming the Power Options, update or rollback the USB chauffeurs, shut off Quick Start-up, or run the USB troubleshooter. Comply with the alternatives given below for more information.
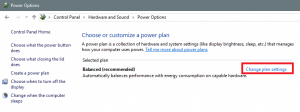
Option 1– Attempt to change the Power Options
- Tap the Win + R keys to open the Run energy.
- After that type “powercfg.cpl” and tap Get in to open up the Power Options home window.
- Next, most likely to your selected power plan as well as click the “Modification plan settings” alternative to open up a brand-new page.

- From there, click the “Adjustment progressed power settings” alternative. This will open a new window where you can see different power intake choices.
- Currently seek the USB Setups alternative and also expand it.
- After that established the USB discerning put on hold setting to “Handicapped” for both scenarios: On Battery and Connected in.
- After that, click on OK as well as reactivate your computer system to apply the adjustments made.
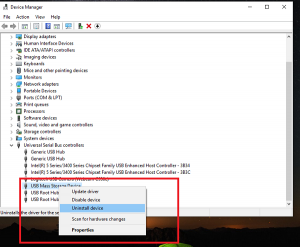
Option 2– Update or reinstall the Universal Serial Bus Controller driver
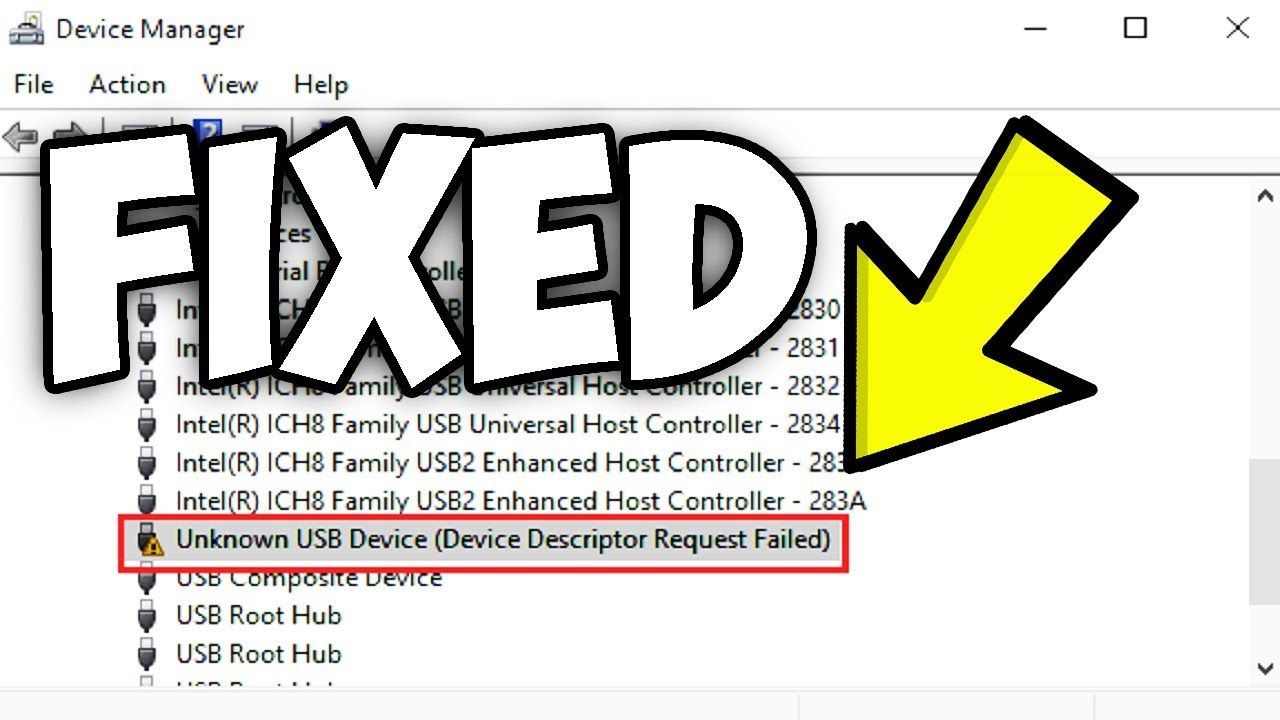
Because it could be a driver concern, you can upgrade or re-install the Universal Serial Bus Controller motorists utilizing the Device Manager. Describe the following actions:
- First, click the Beginning button and type “device supervisor”.
- After that click the “Device Manager” from the search results to open it.
- From there, seek the “Universal Serial Bus controllers” option and after that best click on every one of the USB vehicle drivers and pick the Update Driver from the menu.
Keep in mind: If it is a standard USB drive, it will undoubtedly be noted as a USB Mass Storage Device but if you have a USB 3.0 tool, after that try to find USB 3.0 Extensible Host Controller.

- Reactivate your PC and afterwards click the “Search automatically for updated motorist software application” option.
Note: If updating the USB Controller vehicle drivers didn’t function, you can re-install them instead.
Option 3– Try switching off Rapid Startup unknown usb device set address failed
- Tap the Win + R keys to open the Run dialog box and ticket in “control” to open up the Control Panel.
- Next, click on the Hardware as well as Audio section and click Power Options.
- After that, pick the “Select what the power switches do” alternative from the left side food selection pane.
- Currently click Adjustment setups unavailable and uncheck the entrance stating, “Activate quick startup (Suggested).
- Then click Save Adjustments and also reactivate your computer and also see if it has repaired the problem or not.
Option 4– Run the Equipment and Gadgets Troubleshooters
The first thing you require to do is click on Start and afterwards on the gear-like symbol to bring up the Settings window.
- After opening up Setups, seek the Update and also Protection alternative and choose it.
- From there, most likely to the Troubleshoot choice situated on the left-hand side of the checklist.
- Next, choose Hardware and Instruments from the checklist and open the Troubleshooter and run it. Once it is doing its work, wait to finish the process and afterwards reboot the system.
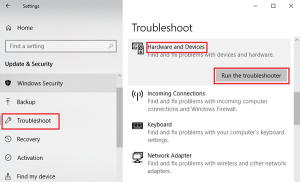

- After the system reactivates, check if the trouble’s now dealt with. If not, describe the next choice provided listed below.
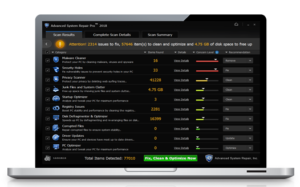
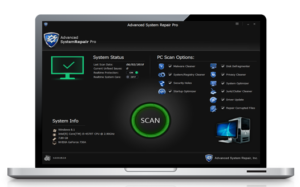
If the guidelines given above didn’t fix the “Unknown USB Device” error, another alternative may aid. Often referred to as a.
one-click remedy, what makes this program better than various other system utility tools or antivirus programs, is that different than helping you maximize disk use and memory in your computer, it enables you to take care of whatever provide your system is dealing with. This program is known as Restoro and also is a helpful device that might repair damaged pc registries as well as maximize your PC’s total efficiency, consisting of Blue Display of Death mistakes.
Besides that, it also clears out your computer for any kind of junk or damaged files that assist you get rid of any type of undesirable files from your system. This is essentially an option that’s within your understanding with merely a click. It’s easy to use as it is user-friendly. For complete set of guidelines in downloading and installing and utilizing it, refer to the steps below.
Execute a full system check utilizing Restoro. To do so, comply with the directions below.
- Turn on your computer system. If it’s already on, you need to reboot.
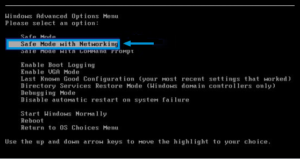

- Afterwards, the BIOS display will be presented, however if Windows turns up instead, reboot your computer system and attempt again. As soon as you get on the BIOS screen, repeat pushing F8, by doing so the Advanced Option appears.
- To browse the Advanced Alternative use the arrow tricks and pick Safe Mode with Networking then struck.
- Windows will now pack the Safe Mode with Networking.
- Press and also hold both R trick and Windows key.
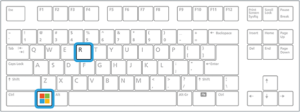

- If done appropriately, the Windows Run Box will undoubtedly appear.
- Key in the LINK address in the Run dialog box and then tap Get in or click OK.
- After that, it will download and install the program. Await the download to end up and after that open the launcher to set up the program.
- Once the installment procedure is completed, run Restoro to perform a complete system check.

- After the scan is finished click the “Repair, Clean & Optimize Currently” button.